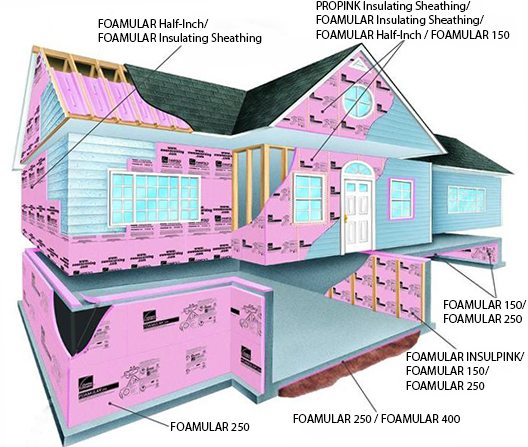
FOAMULAR® INSULPINK® Basement Wall Insulation System
Easy-to-do Home Basement Improvement Project
- Creates added living space such as family or play room, office, home shop, etc.
- Helps give greater energy savings and attractive look
- Enhances comfort of entire home
FOAMULAR® INSULPINK® insulation, as part of a home basement wall do-it-yourself project, provides a high R-value of 5 per inch of product thickness, exceptional resistance to moisture (this can be very important in a basement) and practically hassle-free installation.
There’s no wood framing to erect so there’s a minimum loss of space, and since no vapor retarder is needed, you save both time and money.
When joined side to side, FOAMULAR INSULPINK insulation’s slotted edges create a recess in which wood nailing strips are installed. This technique gives you wall-to-wall insulation that avoids energy-robbing thermal bridging. The strips are then used to secure FOAMULAR INSULPINK insulation and drywall to the basement wall. The entire system can be finished to create an effectively insulated, attractive room to your home.
FOAMULAR INSULPINK insulation is offered in a 1½ ” (R 7.5) thick by 2’ wide by 8’ long board. Things you’ll need: Hand saw, utility knife, electric drill with screwdriver and masonry bits, flathead masonry screws, drywall and drywall screws, tape measure, pencil, level, 1” x 3”, or 1” x 2” wood nailing strips and nailing strips the same thickness as the insulation.
Things you’ll need: Hand saw, utility knife, electric drill with screwdriver and masonry bits, flathead masonry screws, drywall and drywall screws, tape measure, pencil, level, 1” x 3”, or 1” x 2” wood nailing strips and nailing strips the same thickness as the insulation.
Installation Tips
| Basement wall should be clean and dry, and any water leakage problems repaired before installing system. |
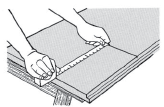 When measuring FOAMULAR INSULPINK insulation, mark the measurement by letting the measuring tape hook slightly on the edge of the board. Score the board as you hold the tape housing. When measuring FOAMULAR INSULPINK insulation, mark the measurement by letting the measuring tape hook slightly on the edge of the board. Score the board as you hold the tape housing. |
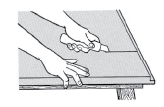 FOAMULAR INSULPINK insulation cuts best when you hold the cutting knife close to the board. FOAMULAR INSULPINK insulation cuts best when you hold the cutting knife close to the board. |
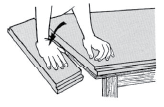 After you have made a deep cut, break the board over a table edge. After you have made a deep cut, break the board over a table edge. |
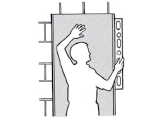 Be sure the FOAMULAR INSULPINK insulation boards are plumb at right angles when installing against basement wall. Be sure the FOAMULAR INSULPINK insulation boards are plumb at right angles when installing against basement wall. |
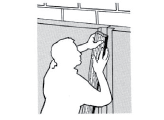 Wood nailing strips (nominal 1” x 3”) are inserted into the slot formed where two FOAMULAR INSULPINK insulation boards meet. Wood nailing strips (nominal 1” x 3”) are inserted into the slot formed where two FOAMULAR INSULPINK insulation boards meet. |
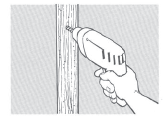 Attach nominal 1” x 3” wood nailing strips by drilling the strip, foam, and masonry wall in four evenly spaced locations. Secure with flathead masonry screws flush with nailing strip, penetrating at 1¼ ” into the masonry wall. Attach nominal 1” x 3” wood nailing strips by drilling the strip, foam, and masonry wall in four evenly spaced locations. Secure with flathead masonry screws flush with nailing strip, penetrating at 1¼ ” into the masonry wall. |
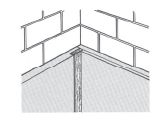 To install FOAMULAR INSULPINK insulation at an inside corner that is less than the full panel width, measure the distance from the edge of the last installed panel to the corner. Cut a panel to fit and install with the cut edge in the corner. Abut the channeled edge of the next panel against the installed corner panel. Apply a 1” x 2” wood nailing strip into the channel and fasten to wall. To install FOAMULAR INSULPINK insulation at an inside corner that is less than the full panel width, measure the distance from the edge of the last installed panel to the corner. Cut a panel to fit and install with the cut edge in the corner. Abut the channeled edge of the next panel against the installed corner panel. Apply a 1” x 2” wood nailing strip into the channel and fasten to wall. |
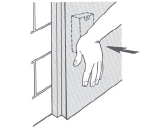 When it is necessary to cut FOAMULAR INSULPINK insulation around a new electric outlet, simply fasten the box to the wall and press the FOAMULAR INSULPINK insulation board against the box to make an impression. Use this impression to cut out the correct size hole. When it is necessary to cut FOAMULAR INSULPINK insulation around a new electric outlet, simply fasten the box to the wall and press the FOAMULAR INSULPINK insulation board against the box to make an impression. Use this impression to cut out the correct size hole. |
 Using a utility knife, hot knife, or router, cut a channel (approximately ½ ” deep) to accommodate the electrical wires. Electrical staples will hold the wire in place.CAUTION: SOME LOCALITIES DO NOT ALLOW YOU TO DO YOUR OWN ELECTRICAL WORK. IN OTHERS, YOU NEED A PERMIT. CHECK YOUR BUILDING CODE FOR RULES AND REGULATIONS. Using a utility knife, hot knife, or router, cut a channel (approximately ½ ” deep) to accommodate the electrical wires. Electrical staples will hold the wire in place.CAUTION: SOME LOCALITIES DO NOT ALLOW YOU TO DO YOUR OWN ELECTRICAL WORK. IN OTHERS, YOU NEED A PERMIT. CHECK YOUR BUILDING CODE FOR RULES AND REGULATIONS. |
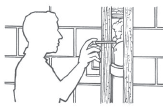 To insulate around protruding fixtures, nailing strips, which are the same thickness as the FOAMULAR INSULPINK insulation panels, should be attached to the wall on both sides of the fixture. Cut the foam to fit and install the cut edge flush against the nailing strip. To completely insulate the wall, spray an appropriate foam insulation into the cavity behind the fixture. To insulate around protruding fixtures, nailing strips, which are the same thickness as the FOAMULAR INSULPINK insulation panels, should be attached to the wall on both sides of the fixture. Cut the foam to fit and install the cut edge flush against the nailing strip. To completely insulate the wall, spray an appropriate foam insulation into the cavity behind the fixture. |
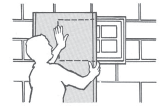 To fit FOAMULAR INSULPINK insulation around a door or window opening, fasten wood strips, the thickness of the insulation, around the perimeter of the opening. Cut the FOAMULAR INSULPINK insulation panels to butt neatly against the strips. To fit FOAMULAR INSULPINK insulation around a door or window opening, fasten wood strips, the thickness of the insulation, around the perimeter of the opening. Cut the FOAMULAR INSULPINK insulation panels to butt neatly against the strips. |
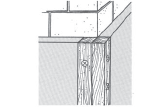 For outside corners, secure a nailing strip equal to the thickness of the insulation to the wall at the corner with face of the strip flush with wall surface. Secure a second nailing strip of the same thickness to the first using wood screws. Make sure the second nailing strip extends beyond the wall only by the thickness of the insulation. Cut FOAMULAR INSULPINK insulation panels to fit and install cut edges against the nailing strips. For outside corners, secure a nailing strip equal to the thickness of the insulation to the wall at the corner with face of the strip flush with wall surface. Secure a second nailing strip of the same thickness to the first using wood screws. Make sure the second nailing strip extends beyond the wall only by the thickness of the insulation. Cut FOAMULAR INSULPINK insulation panels to fit and install cut edges against the nailing strips. |
| Finish with materials as required by local building code (i.e. ½ ” gypsum wallboard) over the FOAMULAR INSULPINK insulation using the nailing strips for attachment. The wall may then be finished to your needs and taste. |


